2 - Guide for Developers
0. Requirements
Java 11 JDK
Install Java JDK 11 (Java Development Kit) (recommend: [adoptopenjdk](https://adoptium.net/installation/)). To verify the installation, run:
Next, set JAVA_HOME. On macOS you can run:
export JAVA_HOME=$(/usr/libexec/java_home -v 11)
On Windows, add a system environment variable called JAVA_HOME that points to the JDK directory.
Install Python 3.12 (or 3.11/3.10) from the official site or your preferred package manager.
Git
On Windows, install the software from https://gitforwindows.org/. Git Bash is available after installing Git.
On Mac and Linux, see https://git-scm.com/book/en/v2/Getting-Started-Installing-Git
Verify the installation by:
Install sbt for building the project. Please refer to sbt Reference Manual — Installing sbt. We recommend you to use sdkman to install sbt.
Verify the installation by:
If the above command fails on Windows after installation, it is recommended to restart your computer.
node LTS Version > 18.x
Install an LTS version (not the latest) of node. Currently, we require LTS version > 18.x.
On Windows, install from https://nodejs.org/en/.
On Mac and Linux, use NVM to install NodeJS as it avoids permission issues.
Verify the installation by:
Angular 16 Cli
Install the angular 16 cli globally:
npm install -g @angular/cli@16
Verify the installation by:
1. Setup Backend Development.
In the terminal, clone the Texera repo:
git clone git@github.com:Texera/texera.git
Do the following changes to the configuration files:
- Edit
common/config/src/main/resources/storage.conf to use your Postgres credentials.
    jdbc {

-        username = "postgres"
+        username = <Postgres username you have>
        username = ${?STORAGE_JDBC_USERNAME}

-        password = "postgres"
+        password = <Postgres password you have>
        password = ${?STORAGE_JDBC_PASSWORD}
    }
- Edit
common/config/src/main/resources/udf.conf to use the correct python executable path(can be obtained by command which python or where python):
python {
-   path =
+   path = "/the/executable/path/of/python"
}
Setup PostgreSQL locally
Texera uses PostgreSQL to manage the user data and system metadata. To install and configure it:
Install Postgres. If you are using Mac, simply execute:
Install Pgroonga for enabling full-text search, if you are using Mac, simply execute:
Execute sql/texera_ddl.sql to create texera_db database for storing user system data & metadata storage
psql -U postgres -f "sql/texera_ddl.sql"
Execute sql/iceberg_postgres_catalog.sql to create the database for storing Iceberg catalogs.
psql -U postgres -f "sql/iceberg_postgres_catalog.sql"
Setup the LakeFS+Minio locally
Texera requires LakeFS and S3(Minio is one of the implementations) as the dataset storage. Setting up these two storage services locally are required to make Texera’s dataset feature functioning.
Install Docker Desktop which contains both docker engine and docker compose. Make sure you launch the Docker after installing it.
In the terminal, enter the directory containing the docker-compose file:
cd file-service/src/main/resources
Edit docker-compose.yml by: search for volumes in the file and follow the instructions in the comment. This step is required otherwise your data will be lost if containers are deleted
Execute the following command to start LakeFS and Minio:
docker compose up
Import the project into IntelliJ
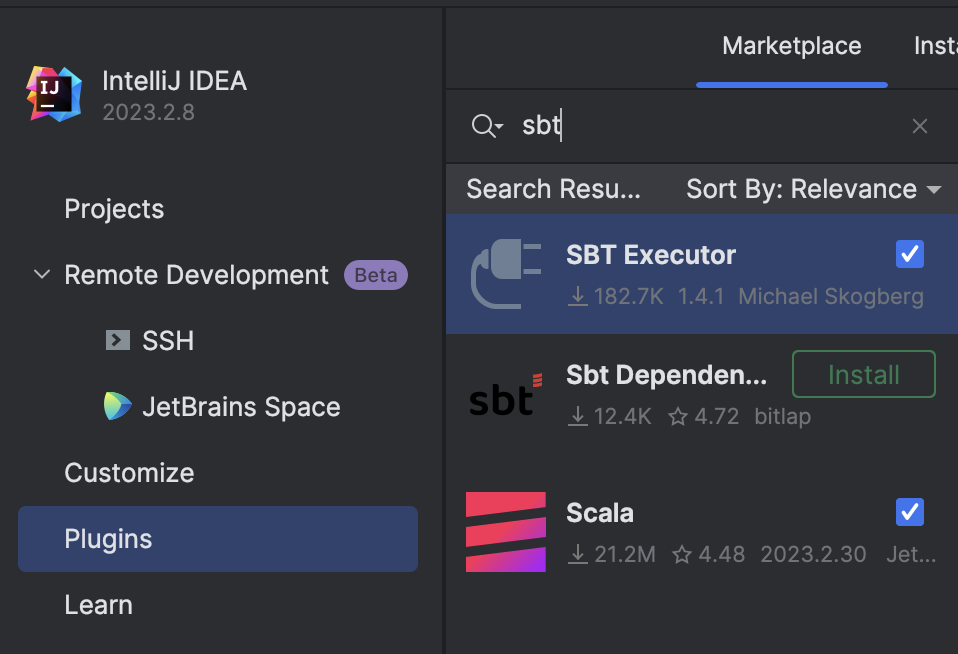
Before you import the project, you need to have “Scala”, and “SBT Executor” plugins installed in Intellij.
- In Intellij, open
File -> New -> Project From Existing Source, then choose the texera folder. - In the next window, select
Import Project from external model, then select sbt. - In the next window, make sure
Project JDK is set. Click OK. - IntelliJ should import and build this Scala project. In the terminal under
texera, run:
sbt clean protocGenerate
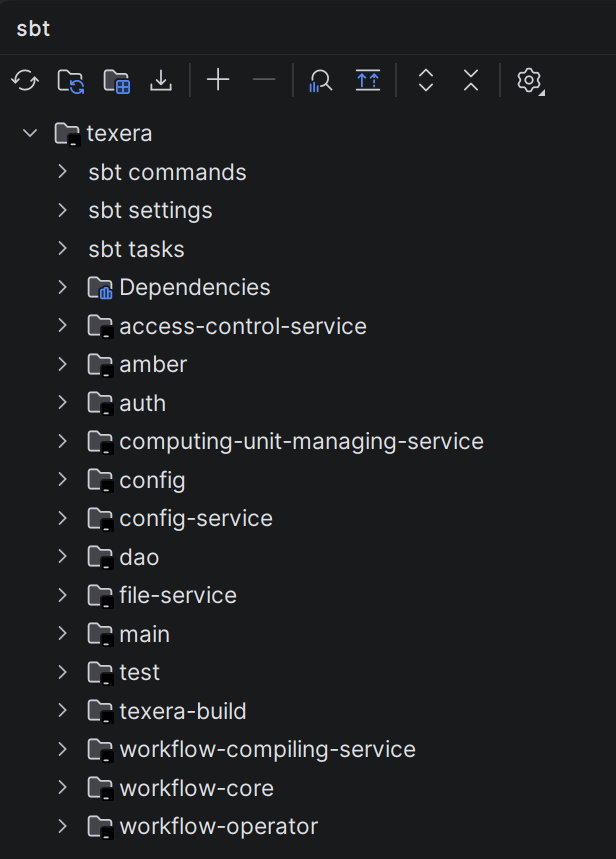
This will generate proto-specified codes. And the IntelliJ indexing should start. Wait until the indexing and importing is completed. And on the right, you can open the sbt tab and check the loaded texera project and couple of sub projects:
When IntelliJ prompts “Scalafmt configuration detected in this project” in the bottom right corner, select “Enable”.
If you missed the IntelliJ prompt, you can check the Event Log on the bottom right
In addition to the microservices, you need to run the JOOQ code generation using sbt DAO/jooqGenerate, make sure to provide Postgres credentials.
Run the backend micro services in IntelliJ
The easiest way to run backend services is in IntelliJ.
Currently we have couple of micro services for different purposes. If one microservice failed after running, it may have dependency to another microservice, so wait for other ones to start, also make sure to run LakeFS docker compose:
| Component | File Path | Purpose / Functionality |
|---|
| ConfigService | config-service/src/main/scala/
org/apache/texera/service/
ConfigService.scala | Hosts the system configurations to allow the frontend to retrieve configuration data. |
| TexeraWebApplication | amber/src/main/scala/
org/apache/texera/web/
TexeraWebApplication.scala | Provides user login, community resource read/write operations, and loads metadata for available operators. |
| FileService | file-service/src/main/scala/
org/apache/texera/service/
FileService.scala | Provides dataset-related endpoints including dataset management, access control, and read/write operations across datasets. |
| WorkflowCompilingService | workflow-compiling-service/src/main/scala/
org/apache/texera/service/
WorkflowCompilingService.scala | Propagates schema and checks for static errors during workflow construction. |
| ComputingUnitMaster | amber/src/main/scala/
org/apache/texera/web/
ComputingUnitMaster.scala | Manages workflow execution and acts as the master node of the computing cluster.
Must start before ComputingUnitWorker. |
| ComputingUnitWorker | amber/src/main/scala/
org/apache/texera/web/
ComputingUnitWorker.scala | A worker node in the computing cluster (not a web server). |
| ComputingUnitManagingService | computing-unit-managing-service/src/main/scala/
org/apache/texera/service/
ComputingUnitManagingService.scala | Manages the lifecycle of different types of computing units and their connections to users’ frontends. |
| AccessControlService | access-control-service/src/main/scala/
org/apache/texera/service/
AccessControlService.scala | Authorize requests sent to computing unit, currently not needed to run for local development, it is only used in Kubernetes setup. |
To run each of the above web service, go to the corresponding scala file(i.e. for TexeraWebApplication, go find TexeraWebApplication.scala), then run the main function by pressing on the green run button and wait for the process to start up.
For TexeraWebApplication, the following message indicates that it is successfully running:
[main] [akka.remote.Remoting] Remoting now listens on addresses:
org.eclipse.jetty.server.Server: Started
For ComputingUnitMaster, the following prompt indicates that it is successfully running:
---------Now we have 1 node in the cluster---------
Enable Python-based Operators
Texera has lots of Python-based operators like visualizations, and UDF operators. To enable them, install python dependencies by executing, you also need to install R in your system:
cd texera
pip install -r amber/requirements.txt -r amber/operator-requirements.txt
2. Launch Frontend
This is for developers that work on the frontend part of the project. This step is NOT needed if you develop the backend only.Before you start, make sure the backend services are all running.
Install Angular CLI
Ignore those warnings (warnings are usually marked in yellow color or start with WARN).
Launch Frontend in IntelliJ for local development
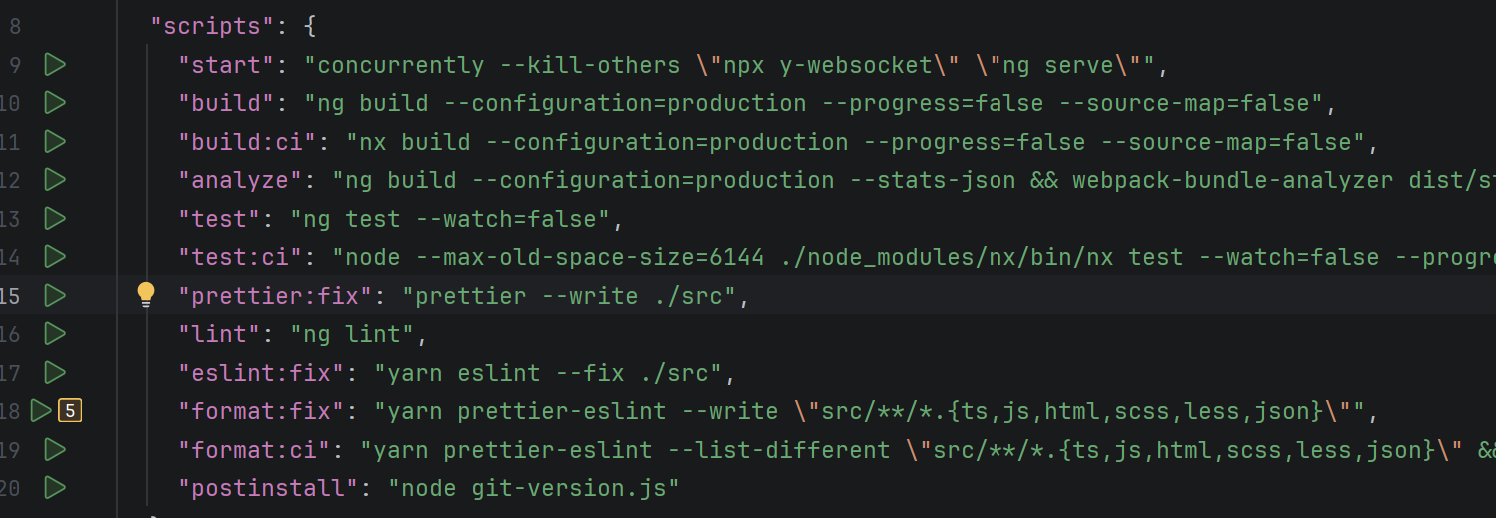
- Click on the Green Run button next to the
start in frontend/package.json. - Wait for some time and the server will get started. Open a browser and access
http://localhost:4200. You should see the Texera UI with a canvas.\
Every time you save the changes to the frontend code, the browser will automatically refresh to show the latest UI.
You can also run frontend using command line:
Launch Frontend in the production environment
Run the following command
yarn run build
This command will optimize the frontend code to make it run faster. This step will take a while. After that, start the backend engine in IntelliJ and use your browser to access http://localhost:8080.
3. Email Notification (Optional)
- Set
smtp in config/src/main/resources/user-system.conf. You need an App password if the account has 2FA. - Log in to Texera with an admin account.
- Open the Gmail dashboard under the admin tab.
- Send a test email.
4. Misc
This part is optional; you only need to do this if you are working on a specific task.
To create a new database table and write queries using Java through Jooq
- Create the needed new table in MySQL and update
sql/texera_ddl.sql to include the new table. - Run
sbt DAO/jooqGenerate to generate the classes for the new table.
Note: Jooq creates DAO for simple operations if the requested SQL query is complex, then the developer can use the generated Table classes to implement the operation
Disable password login
Edit config/src/main/resources/gui.conf, change local-login to false.
Enforce invite only
Edit config/src/main/resources/user-system.conf, change invite-only to true.
Backend endpoints Role Annotation
There are two types of permissions for the backend endpoints:
- @RolesAllowed(Array(“Role”))
- @PermitAll
Please don’t leave the permission setting blank. If the permission is missing for an endpoint, it will be @PermitAll by default.
Windows: enable long paths
Some workflows create deep directories (e.g., when writing metadata.json via Python/ICEBERG). On Windows, this can exceed the legacy MAX_PATH (~260 chars) and cause failures like:
[WinError 3] The system cannot find the path specified.
Enable long paths support (per machine) by running PowerShell as Administrator:
New-ItemProperty -Path "HKLM:\SYSTEM\CurrentControlSet\Control\FileSystem" -Name "LongPathsEnabled" -Value 1 -PropertyType DWORD -Force
Verify the setting (expected value: 1):
Get-ItemProperty -Path "HKLM:\SYSTEM\CurrentControlSet\Control\FileSystem" -Name "LongPathsEnabled"
If you cannot change this policy (e.g., on managed devices), keep your workspace path short (e.g., C:\src\texera) to reduce overall path length.
Windows: Fix HADOOP_HOME errors
On Windows, if you encounter the following error when executing a workflow:
Caused by: java.io.FileNotFoundException: HADOOP_HOME and hadoop.home.dir are unset
here are the steps to solve this issue:
Steps
- Obtain a
winutils.exe matching your Hadoop line (Texera currently uses Hadoop 3.3.x). - Create the directory and place the binary:
C:\hadoop\bin\winutils.exe
- In IntelliJ, add this VM option to the FileService run configuration:
-Dhadoop.home.dir="C:\hadoop"
- (Optional) Also set a system environment variable and restart the IDE/terminal:
HADOOP_HOME=C:\hadoop
Notes
- This issue may happen only on Windows; macOS/Linux do not need
winutils.exe. - Ensure the
winutils.exe you use matches your Hadoop major/minor (e.g., 3.3.x). - After configuring, the prior read/write and “unset” errors should disappear.
3 - Guide to Frontend Development (new gui)
Author: Yinan Zhou
Introduction:
If you are new to Texera frontend development team or have little frontend experience using angular framework (version 6), this read intends to provide you with a simple guide of how to get started.
Preparation phase:
In a nutshell, angular provides modularity, scalability, and robustness to traditional frontend code design. It separates a website into different individual components that can each perform a certain level of independent tasks. It then connects different components with services so they can work collaboratively. It also provides unit testing at the component level as well as application level.
Other than these, angular largely inherits the traditional way of creating a web page. Each component contains four foundational files (.ts | .html | .css | spec.ts), corresponding to typescript (which is basically JavaScript with better scalability), HTML, CSS, and unit testing respectively. Just like how web pages were traditionally written, you will be coding in
- html: the structure of the component
- css: the style of the component
- typescript: the content of the component
and additionally:
- unit tests: so that the component can be debugged in the future if it breaks
Don’t be overwhelmed. You don’t have to be a master in all these four fields to start working on texera frontend. If you have basic web development experience, you can jump to the next section to get started with learning angular. If you have no such experience, you should at least spend a few hours getting familiar with HTML, CSS, and JavaScript. The following links might be helpful.
The following links are documentation and examples, don’t try to master all the knowledge from these websites at once, use them as dictionaries. They will be helpful when you start coding so don’t waste too much time on them now.
Angular Tutorial Phase:
At this point, you should at least be able to interpret an HTML/CSS/Typescript file with your own knowledge and the information you can find online. For the next few weeks,
- go through the tutorial provided on the Angular official website, https://angular.io/guide/quickstart
- watch tutorial videos, (ask frontend group leader to share the videos with you on google drive)
- especially pay attention to the rxjs videos, you will need them a lot.
Although these tutorial videos are helpful, it can take a long time to finish watching them. Meanwhile, it is easy to forget what you have learned if you do not practice coding it. Therefore, I recommend you begin the next phase once you finish step 1.
Frontend Code Base:
At this point, you should know how to approach a simple angular application and interpret it using your own knowledge and the information you can find online. Download Visual Studio Code and relevant extensions, get access to Texera front-end code base (instructions can be found here). You should:
- have a general understanding of the structure of the new-gui, what components are there? What do they do? What services are connecting them.
- You should have a feature in mind that you want to implement. Locate the component and services that are relevant to the feature you want to implement. Carefully read through the code in those sections, make sure you understand what is going on behind the scene.
- Start coding, then debug, and repeat. :)
- Look for solutions in the tutorial videos I mentioned in the previous phase step 2&3 when you have questions.
- Make good use of google, stack overflow, etc. However, be aware that a lot of code examples online can be outdated since we are using the most recent version of angular with rxjs.
useful tips that you should know how:
- Right-click a variable/class/method name in the code base in visual studio code, then click “Peek Definition” or “Find All References”. It shows you how it was defined and where it has been used.
- Right-click web page and inspect elements
- You can Console.log(ThingsYouWantToInspect) in the code base; the logged information will appear in the console window after you do step 2.
Unit testing:
Don’t worry about unit testing at the beginning. Finish the feature first and then write unit tests for it.
4 - Guide to Implement a Java Native Operator
In this page, we’ll explain the basic concepts in Texera and use examples to show how to implement an operator.
Code structure of every operator:
Every operator ideally has three classes that are found in each operator package in core\workflow-operator\src\main\scala\edu\uci\ics\amber\operator
- LogicalOp
- OperatorExecutor
- OperatorExecutorConfig
Basic concepts:
A Texera user constructs a workflow using the frontend, which consists of many operators. Each operator take input data from its previous operator(s), does some computation, and outputs the results to the next operator(s).
Suppose we have the following sample records, each of which has an ID and a tweet.
id		tweet
1		"today is a good day"
2		"weather is bad during the day"
Each row is called a Tuple, and each column is called a Field.
// get the value of a field by column name
tuple1.getField("id") // result: 1
tuple1.getField("tweet") // result: "today is a good day"

// get the value by column index
tuple1.get(0) // result: 1
In this dataset, we have 2 columns, namely id of the integer type and tweet of the string type. This information is called a Schema.
A schema contains a list of attributes, and each attribute has a name (name of the column) and a type (data type of the column).
schema = tuple.getSchema()
schema.getAttributes().get(0) // Attribute("id", AttributeType.Integer)
schema.getAttributes().get(1) // Attribute("tweet", AttributeType.String)
Example 1: Regular Expression (regex) operator
A regular expression operator matches a regular expression (regex) on each input tuple. For example, if we search the regex “weather” on the tweet attribute, then only tuple 2 will be the result. In other words, the regular expression operator is a kind of filter() operation in many programming languages.
To implement a regular expression operator, you will first need to write an LogicalOp. The following code is part of class RegexOpDesc .
class RegexOpDesc extends FilterOpDesc {

  @JsonProperty(required = true)
  @JsonSchemaTitle("attribute")
  @JsonPropertyDescription("column to search regex on")
  @AutofillAttributeName
  var attribute: String = _

  @JsonProperty(required = true)
  @JsonSchemaTitle("regex")
  @JsonPropertyDescription("regular expression")
  var regex: String = _

  @JsonProperty(required = false, defaultValue = "false")
  @JsonSchemaTitle("Case Insensitive")
  @JsonPropertyDescription("regex match is case sensitive")
  var caseInsensitive: Boolean = _
}
The regular expression operator needs to take 3 properties from the user, namely attribute (the name of the column to search on), regex (the regular expression itself) and caseInsensitive (whether case sensitive for this regular expression).
The @JsonProperty annotation will let the system know that this property needs to come from the user input, and it will automatically generate the corresponding input form in the frontend.
Inside @JsonProperty, required = true tells the frontend that this property is required from the user. The property also needs to provide a user-friendly title (inside @JsonSchemaTitle annotation) and a detailed description (inside @JsonPropertyDescription annotation). @AutofillAttributeName annotation tells the frontend to provide autocomplete on attribute name (name of the column).
This operator descriptor also needs to provide information about this operator, including a user-friendly name, description, the group it belongs to, and number of input/output ports.
  override def operatorInfo: OperatorInfo =
    OperatorInfo(
      userFriendlyName = "Regular Expression",
      operatorDescription = "Search a regular expression in a string column",
      operatorGroupName = OperatorGroupConstants.SEARCH_GROUP,
      numInputPorts = 1,
      numOutputPorts = 1
    )
Finally, the operator descriptor needs to specify its corresponding operator executor. An OperatorExecutor, or OpExec for short, contains the implementation of the processing logic in the operator. For the regular expression operator, it corresponds to RegexOpExec. The OpDesc supplies an OpExecInitInfo with a function that creates the corresponding operator executor () => new RegexOpExec(this). When creating a PhysicalOp (e.g., using oneToOnePhysicalOp in this case, which is one type of physical operator that should be used in most cases), the OpExecInitInfo is passed in for the PhysicalOp to use.
  PhysicalOp.oneToOnePhysicalOp(
      executionId,
      operatorIdentifier,
      OpExecInitInfo(_ => new RegexOpExec(this))
    )
The implementation of the regular expression operator executor is rather simple. Since this operator is doing a kind of filter() operation, it extends a pre-defined class FilterOpExec. It calls setFilterFunc to specify the filter function used by this operator: the matchRegex function. In matchRegex, we first get the string value of a column, and then test if the value matches the regex.
class RegexOpExec(val opDesc: RegexOpDesc) extends FilterOpExec {
  val pattern: Pattern = Pattern.compile(opDesc.regex)
  this.setFilterFunc(this.matchRegex)

  def matchRegex(tuple: Tuple): Boolean = {
    val tupleValue = tuple.getField(opDesc.attribute).toString
    return pattern.matcher(tupleValue).find
  }
}
This operator needs to be registered to let the system know its existence. In the LogicalOp class, we need to add a new entry, which specifies its operator descriptor class and a unique operator name.
@JsonSubTypes(
  Array(
    new Type(value = classOf[RegexOpDesc], name = "Regex"),
  )
)
abstract class LogicalOp extends PortDescriptor with Serializable {
}
Now this operator will be automatically available in the frontend. We can now start the system and test this operator.
To add an image for this operator, go to core/gui/src/assets/operator_images, then add an image with the SAME NAME as what’s specified in the operator registration. The image file should be in png format, with a transparent background, black and white, and should be square.
For example, for the regex operator, the code new Type(value = classOf[RegexOpDesc], name = "Regex") specified a name Regex, then the image file name should be Regex.png.
Summary: we have gone through the steps to implement a simple regular expression operator. This operator is a type of filter() operation. So it’s built on top of a set of pre-defined classes, FilterOpDesc, FilterOpExec, and FilterOpExecConfig.
Example 2: Sentiment Analysis operator
A map() operation processes one input tuple and produces exactly one output tuple. Next, we’ll briefly explain the map() type of operators using the Sentiment Analysis operator as an example.
The sentiment analysis operator uses the Stanford NLP package to analyze the sentiment of a text. Given the example dataset above, the output of this operator looks like this:
id		tweet					sentiment
1		"today is a good day"			"positive"
2		"weather is bad during the day"		"negative"
The following code is the implementation of class SentimentAnalysisOpDesc in Java.
public class SentimentAnalysisOpDesc extends MapOpDesc {

    @JsonProperty(required = true)
    @JsonSchemaTitle("attribute")
    @JsonPropertyDescription("column to perform sentiment analysis on")
    @AutofillAttributeName
    public String attribute;

    @JsonProperty(value = "result attribute", required = true, defaultValue = "sentiment")
    @JsonPropertyDescription("column name of the sentiment analysis result")
    public String resultAttribute;

    @Override
    public OneToOneOpExecConfig operatorExecutor() {
        return new OneToOneOpExecConfig(operatorIdentifier(), () -> new SentimentAnalysisOpExec(this));
    }

    @Override
    public OperatorInfo operatorInfo() {
        return new OperatorInfo(
                "Sentiment Analysis",
                "analysis the sentiment of a text using machine learning",
                OperatorGroupConstants.ANALYTICS_GROUP(),
                1, 1
        );
    }

    @Override
    public Schema getOutputSchema(Schema[] schemas) {
        if (resultAttribute == null || resultAttribute.trim().isEmpty()) {
            return null;
        }
        return Schema.newBuilder().add(schemas[0]).add(resultAttribute, AttributeType.STRING).build();
    }
}
You’ll notice that this operator implements a new function, getOutputSchema. This is because this operator adds a new column called sentiment. The function getOutputSchema returns the output schema produced by this operator given an input schema.
In this implementation, resultAttribute is the new column name given by the user (default value is “sentiment”). If the value is empty, we return a null value to indicate that the output schema cannot be produced. The result schema includes all the attributes from the input schema, plus a new attribute of type string.
The regular expression operator does not implement this function because a filter() operation does not add or remove any columns.
The implementation of SentimentAnalysisOpExec extends MapOpExec and provides a map function. You can check the implementation in the codebase.
Generic operations
In Texera, currently we have 4 pre-defined operations you can extend.
filter(): filters out any input tuple if it doesn’t satisfy a condition.map(): for each input tuple, transforms it to exactly one output tuple.flatmap(): for each input tuple, transforms it to a list of output tuples.aggregate(): performs an aggregation, such as sum, count, average, etc.
To implement an operator, you can first check if your operator can be implemented using the 4 pre-defined operations. You can find these pre-defined operations under texera/workflow/common/operators. Your own operator implementation should be in texera/workflow/operators/youroperator.
Low-level OperatorExecutor API
For more complicated operators, if they cannot be implemented using these operations, then you need to implement OperatorExecutor using the following low-level interface.
trait IOperatorExecutor {

  def open(): Unit

  def close(): Unit

  def processTuple(tuple: Either[ITuple, InputExhausted], input: Int): Iterator[ITuple]

}
The open() and close() functions allow you to initialize and dispose any resources (such as opened files), respectively. They will be called once before and after the whole execution by the engine. The important function is processTuple, which implements the processing logic inside the operator.
The processTuple function takes two parameters: tuple and input. Since an operator can have multiple input ports, and each input port can have multiple input operators connected to (e.g., Union), input: Int indicates which input port the current tuple is coming from. The parameter tuple is either a Tuple type or an InputExhausted type, indicating all data from an input operator has been exhausted. It returns an Iterator[Tuple], which means zero or more output tuples can be produced following this input. processTuple will be called whenever a new input tuple arrives, and called once if the input is exhausted. When an input port is connected to multiple input operators, this InputExhausted will be processed multiple times (once per input operator).
General content:
Texera’s backend is responsible for determining the UI information to the frontend. After receiving the information, the frontend efficiently translates and presents the content.
Input Box
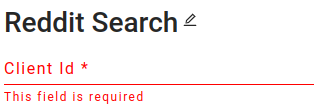
Here is an example of a user input box, with the name “Client Id” and its description.
@JsonProperty(required=true)
@JsonSchemaTitle("Client Id")
@JsonPropertyDescription("Client id that uses to access Reddit API")
var clientId: String = _
Multiple selection
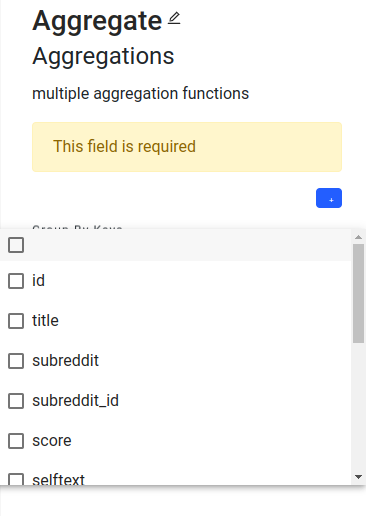
Here is an example of a multiple selection in the aggregate operator.
@JsonProperty(value = "attribute", required = true)
@JsonPropertyDescription("column to calculate average value")
@AutofillAttributeName
var attribute: String = _
In the backend, we assign the attribute name list to fill the selections. Since it is multiselection, the type needs to be a list.
Checkbox

For the checkbox, we assign the data type to boolean. Here is an example in pythonUDF operator. By setting the data type to boolean, we successfully implement it as a checkbox.
@JsonProperty(required = true, defaultValue = "true")
@JsonSchemaTitle("Retain input columns")
@JsonPropertyDescription("Keep the original input columns?")
var retainInputColumns: Boolean = Boolean.box(false)
List
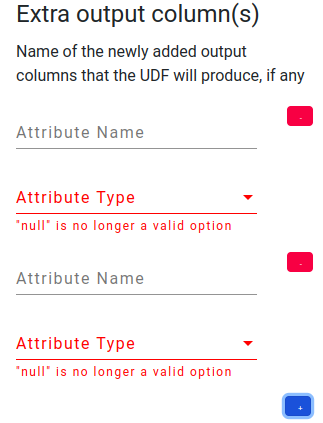
In pythonUDF operator, there is an example of a list, which is for the output schema. By clicking the blue button, we can add one more pair of attribute information. And the red button will delete such attribute information. In the backend, we have a list to hold the attribute values.
@JsonProperty
@JsonSchemaTitle("Extra output column(s)")
@JsonPropertyDescription(
"Name of the newly added output columns that the UDF will produce, if any"
)
var outputColumns: List[Attribute] = List()
Registration and icon
In the file amber/src/main/scala/edu/uci/ics/texera/workflow/common/operators/LogicalOp.scala, you will find a list of all registered operators, complete with their descriptor classes and names. After adding an operator’s information, you can assign an icon to it. All operator icons are stored in the /core/new-gui/src/assets/operator_images directory. It’s essential to ensure that the icon filename matches its respective operator descriptor name.
5 - Guide to Implement a Python Native Operator (converting from a Python UDF)
In the page for PythonUDF, we introduced the basic concepts of PythonUDF and described each API. To let other users use the Python operators, it is necessary to implement it as a native operator.
In this section, we will discuss how to implement a Python native operator and let future users drag and drop it on the UI. We will start by implementing a sample UDF then talk about how to convert it to a native operator.
Starting with a Sample Python UDF
Suppose we have a sample Python UDF named Treemap Visualizer, as presented below:
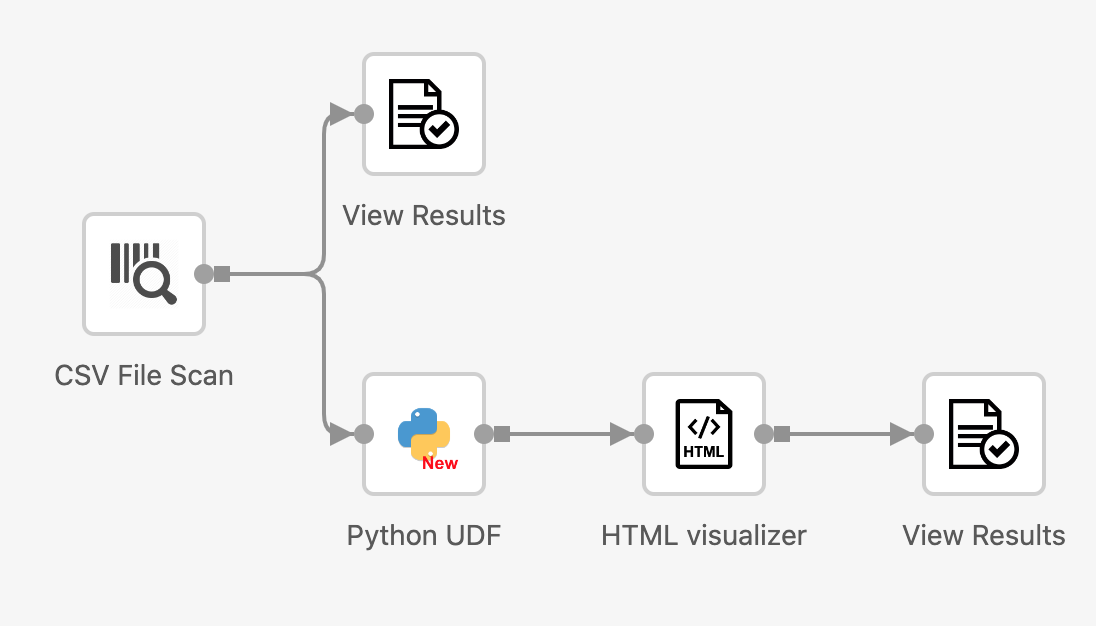
The UDF takes a CSV file as its input. For this example, we use a dataset of geo-location information of tweets. A sample of the dataset is shown below:
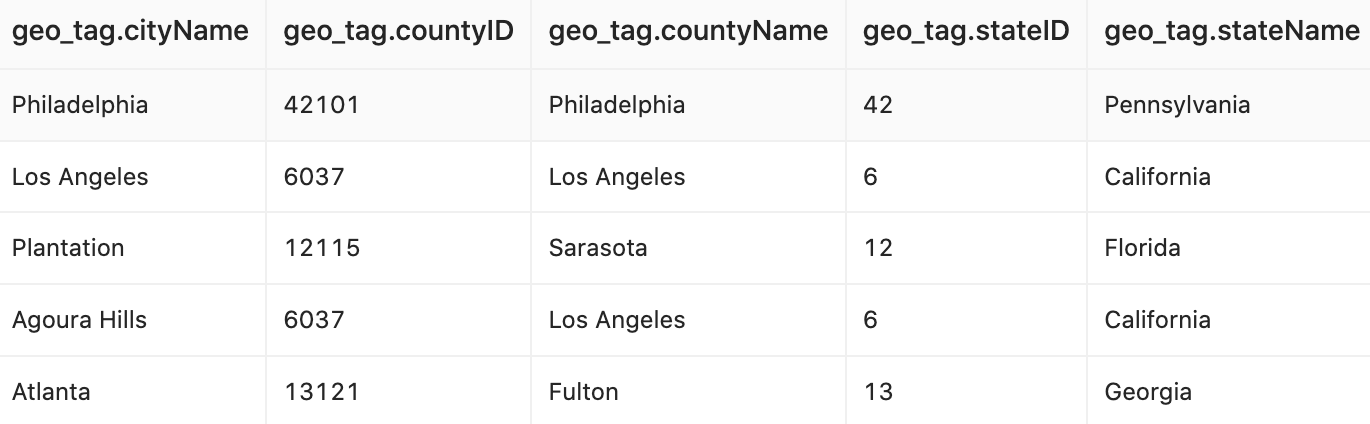
The Treemap Visualizer UDF takes the CSV file as a table (using the Table API) and outputs an HTML page that contains a treemap figure. The HTML page will be consumed by the HTML visualizer operator, and the View Result operator eventually displays the figure in the browser. The visualization is presented below:
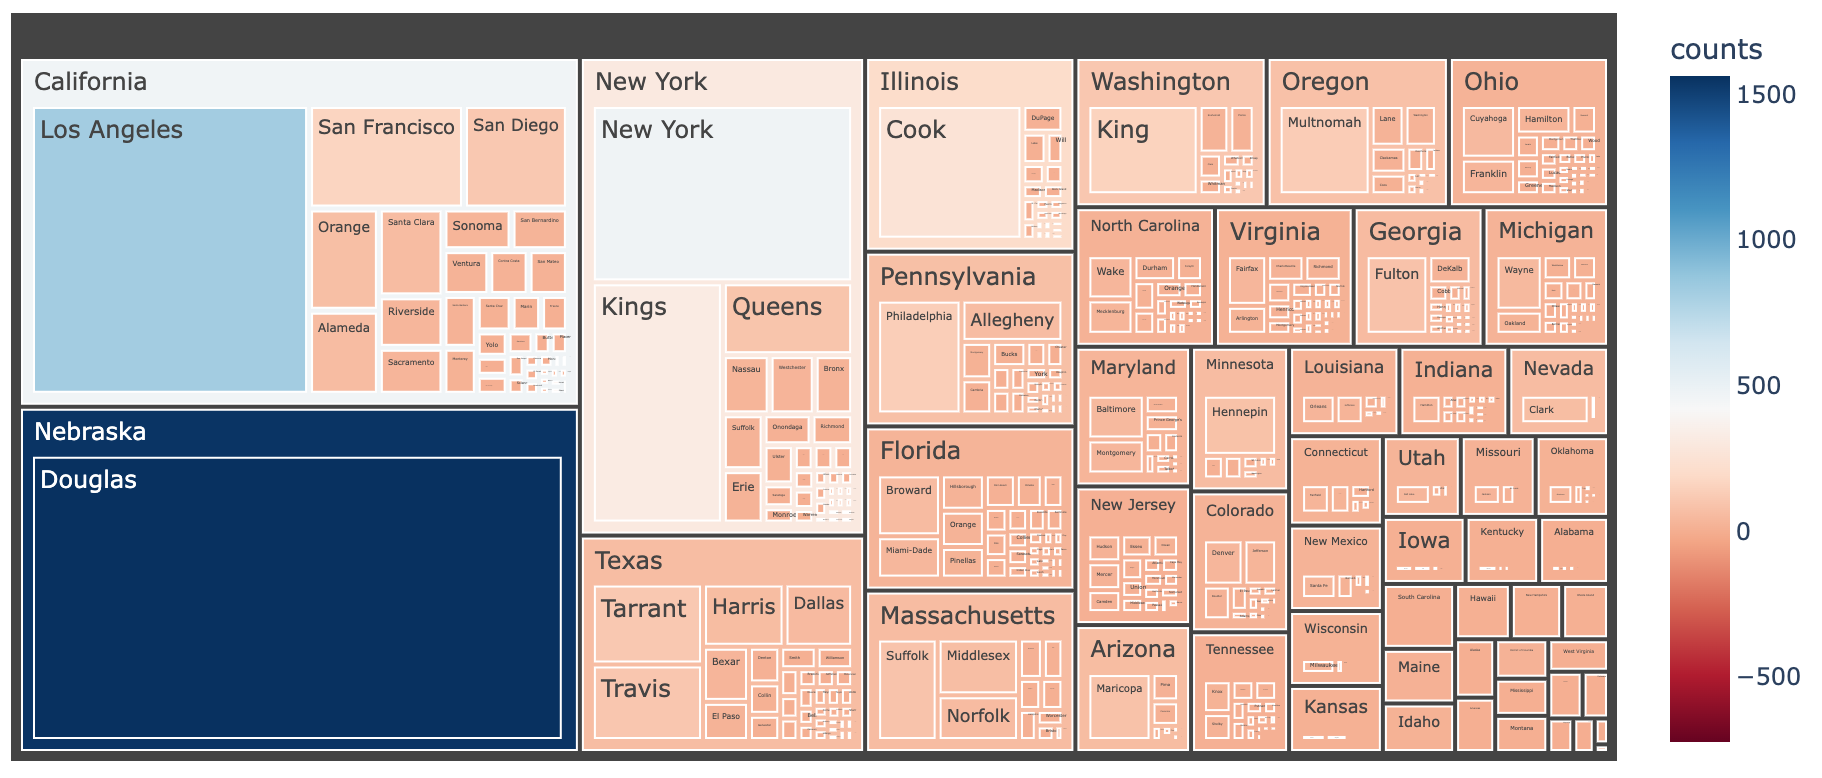
Now, let’s take a closer look at the Treemap Visualizer UDF.
As shown in the following code block, the UDF contains 3 steps:
from pytexera import *

import plotly.express as px
import plotly.io
import plotly
import numpy as np


class ProcessTableOperator(UDFTableOperator):

    @overrides
    def process_table(self, table: Table, port: int) -> Iterator[Optional[TableLike]]:
        table = table.groupby(['geo_tag.countyName','geo_tag.stateName']).size().reset_index(name='counts')
        #print(table)
        fig = px.treemap(table, path=['geo_tag.stateName','geo_tag.countyName'], values='counts',
                         color='counts', hover_data=['geo_tag.countyName','geo_tag.stateName'],
                         color_continuous_scale='RdBu',
                         color_continuous_midpoint=np.average(table['counts'], weights=table['counts']))
        fig.update_layout(margin=dict(t=50, l=25, r=25, b=25))
        html = plotly.io.to_html(fig, include_plotlyjs='cdn', auto_play=False)
        yield {'html': html}
- It first performs an aggregation with a groupby to calculate the number of geo_tags of each US state.
- Then it invokes the Plotly library to create a treemap figure based on the aggregated dataset.
- Lastly, it converts the treemap figure object into an HTML string, by invoking the
to_html function in the Plotly library, and yields it as the output.
Convert the UDF into a Python Native Operator
Next we convert the Treemap Visualizer UDF into a native operator.
As described in thepage for Java native operator, a native operator requires the definitions of a descriptor (Desc), an executor (Exec), and a configuration (OpConfig). A Python native operator also requires these definitions, with some unique tweaks. We use the Treemap Visualization operator as an example to elaborate the differences:
Operator Descriptor (Desc)
Operator infomation
The operator information is the same as a Java native operator, which contains the name, description, group, input port, and output port information.
Extending interface
Instead of implementing the OperatorDescriptor interface, a Python native operator implements the PythonOperatorDescriptor interface with overriding the generatePythonCode method. Our example is a VisualizationOperator, and we need to extend it as well.
Python content
The generatePythonCode method returns the actual Python code as a string, as shown below:
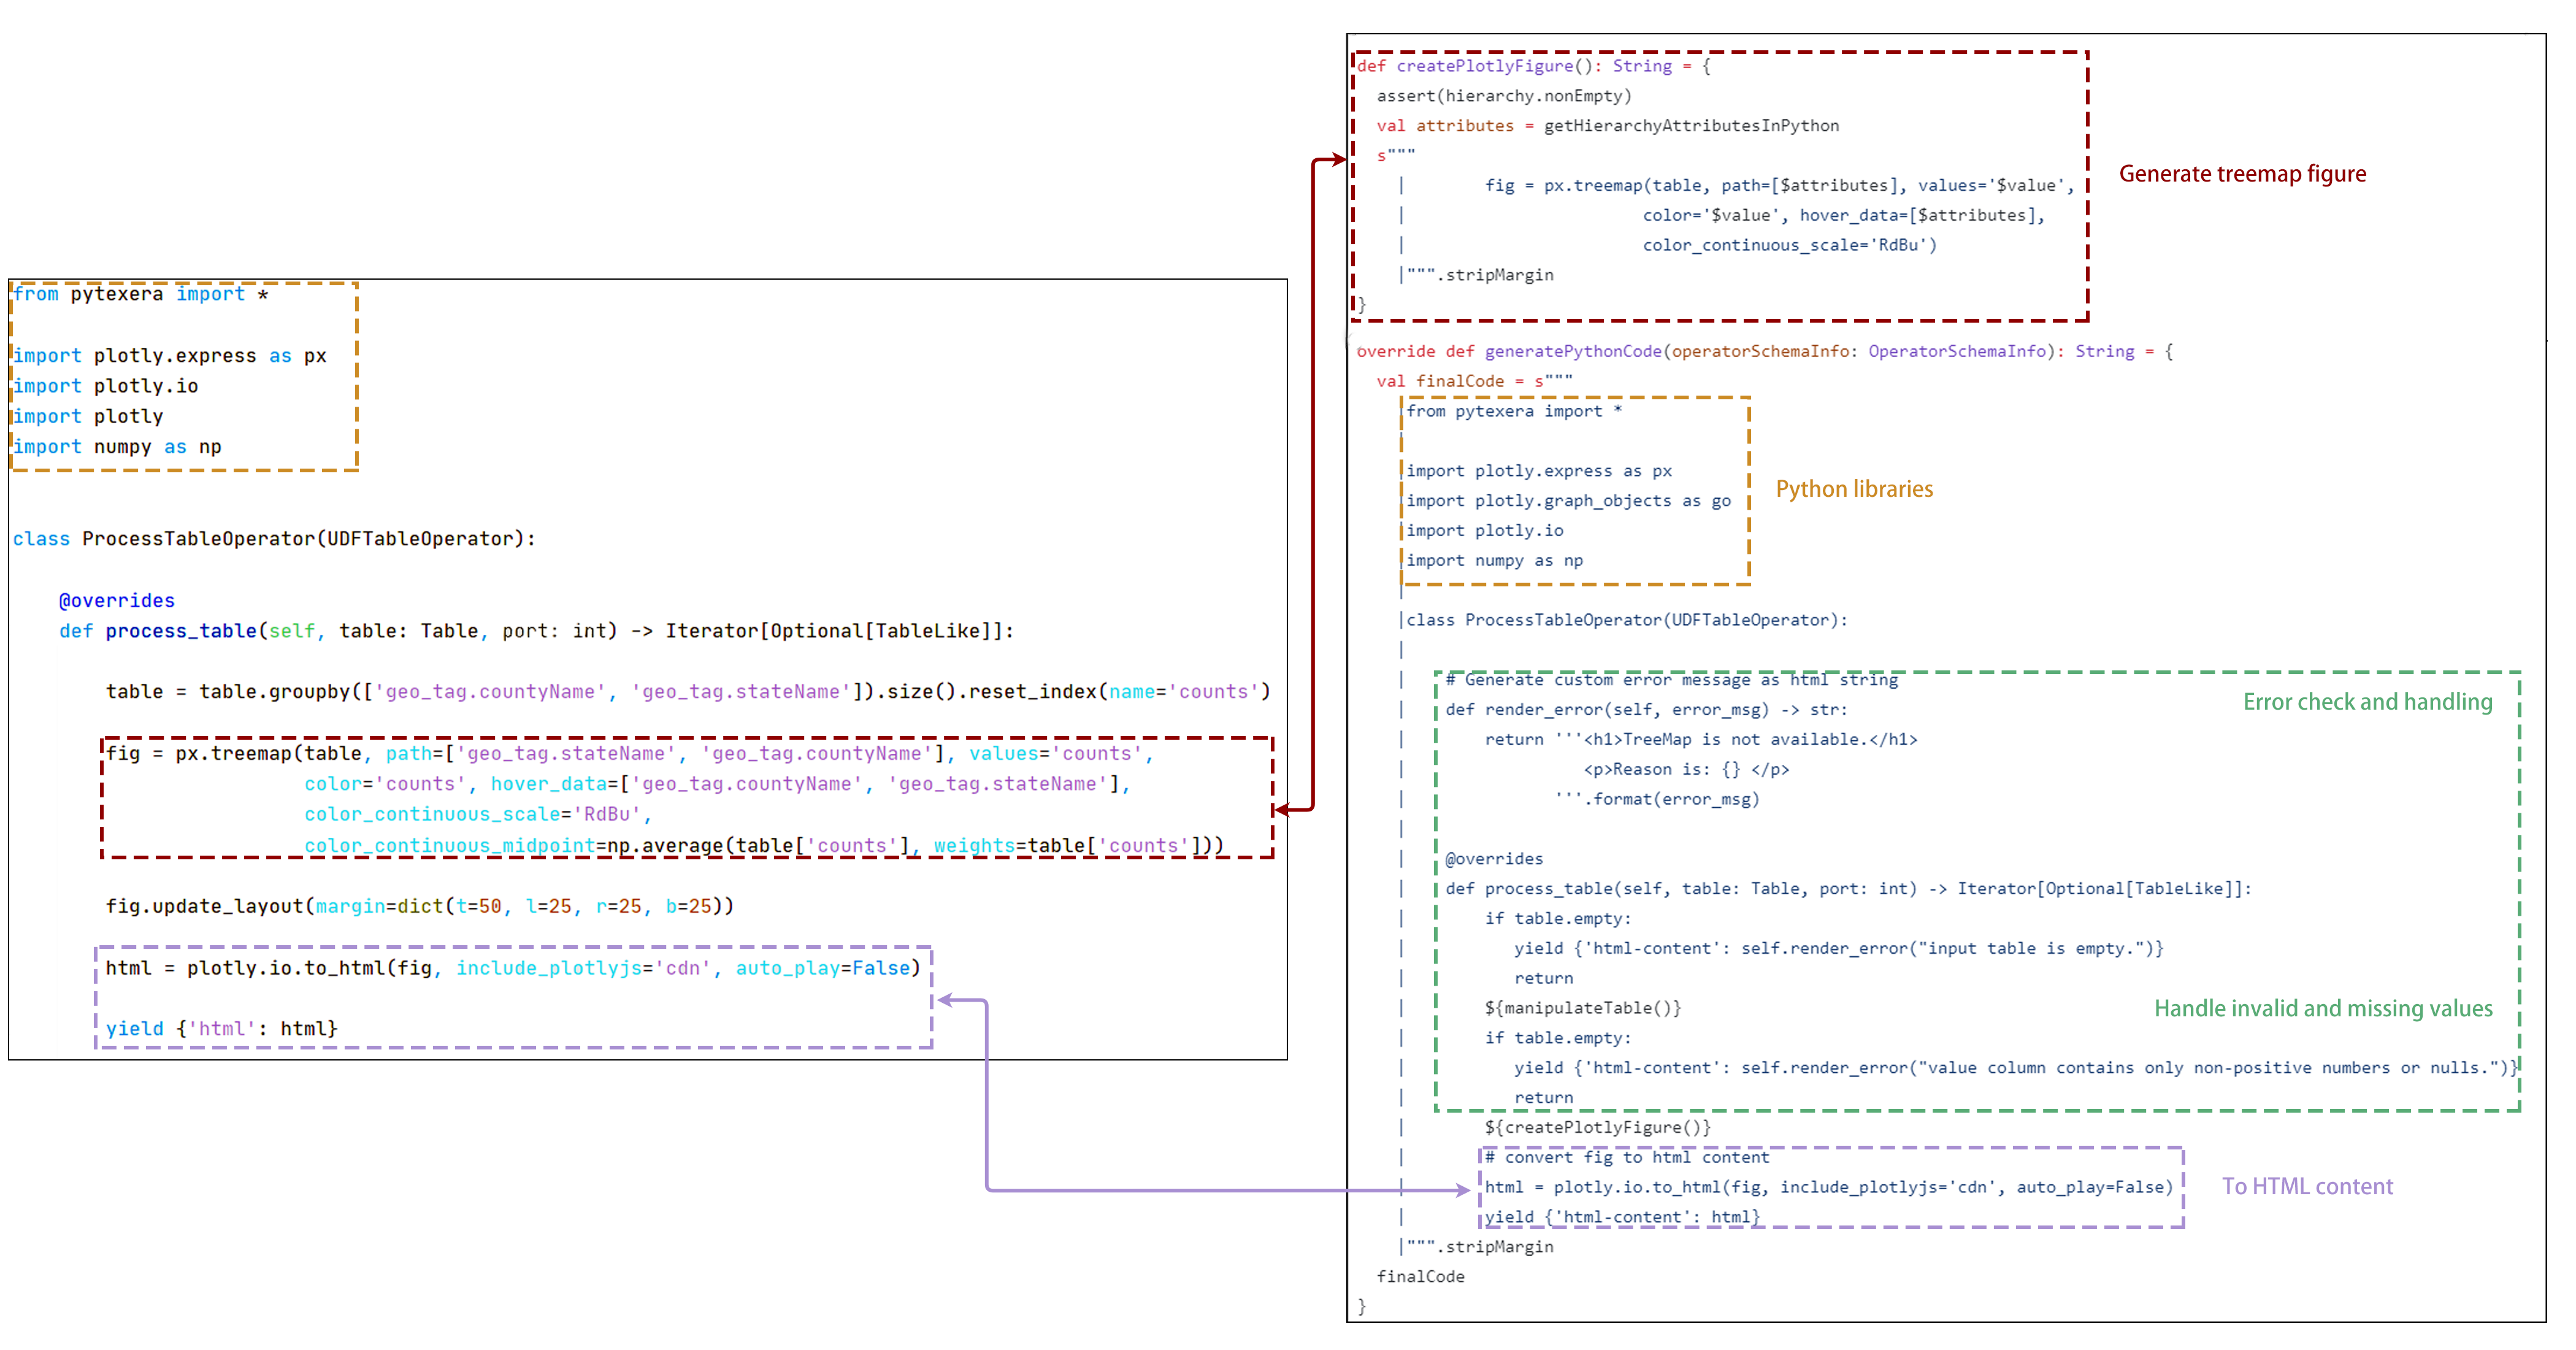
Now, let’s compare the code in the PythonUDF with what we write in the descriptor. As we can see, both are responsible for generating the treemap figure and converting it into an HTML page. Additionally, we’ve included null-value handling and error alerts to make the operator more comprehensive.
Output schema
The Python UDF needs to define the output Schema in the property editor, while for native operators the output Schema is defined by implementing getOutputSchema. To do so, we use a Schema builder and add the output schema with the attribute name “html-content”.
override def getOutputSchema(schemas: Array[Schema]): Schema = {
        Schema.newBuilder.add(new Attribute("html-content", AttributeType.STRING)).build
      }
Chart type
Since this operator is a visualization operator, we need to register its chart type as a HTML_VIZ.
override def chartType(): String = VisualizationConstants.HTML_VIZ
Executor (Exec)
In all Python native operators, the executor is simply the PythonUDFExecutor.
Operator Configuration
In a Python native operator, it shares the same configuration as a Java native operator.
Registration
It has the same process as a Java native operator.
Test
After following all the steps above, you should be able to drag and drop the operator into the canvas. During the execution, the operator will output the expected result.
6 - Build, Run and Configure micro‐services in local development environment
This Document is aim to provide a instruction on how to setup the local development environment for developing and deploying the core/micro-services.
Prerequisite
This document requires you to finish all the setup of Texera local development environment described in https://github.com/Texera/texera/wiki.
What is micro-services?
core/micro-services is a sbt-managed project added by the PR https://github.com/Texera/texera/pull/2922. The ongoing code separation effort will gradually migrate all the services in core/amber to core/micro-services.
How to directly build and run the micro-services directly
If you just want to run some services under micro-services, you can use some provided shell scripts.
WorkflowCompilingService
cd texera/core

# make sure to give scripts the execution permission
chmod +x scripts/build-workflow-compiling-service.sh
chmod +x scripts/workflow-compiling-service.sh

# Build the WorkflowCompilingService
scripts/build-workflow-compiling-service.sh

# Run the WorkflowCompilingService
scripts/workflow-compiling-service.sh
How to set up the development environment
As there are many sub sbt projects under micro-services, Intellij is the most suitable IDE for setting up the whole environment
Use Intellij (Most Recommended)
- Open the folder
texera/core/micro-services through Open Project in Intellij
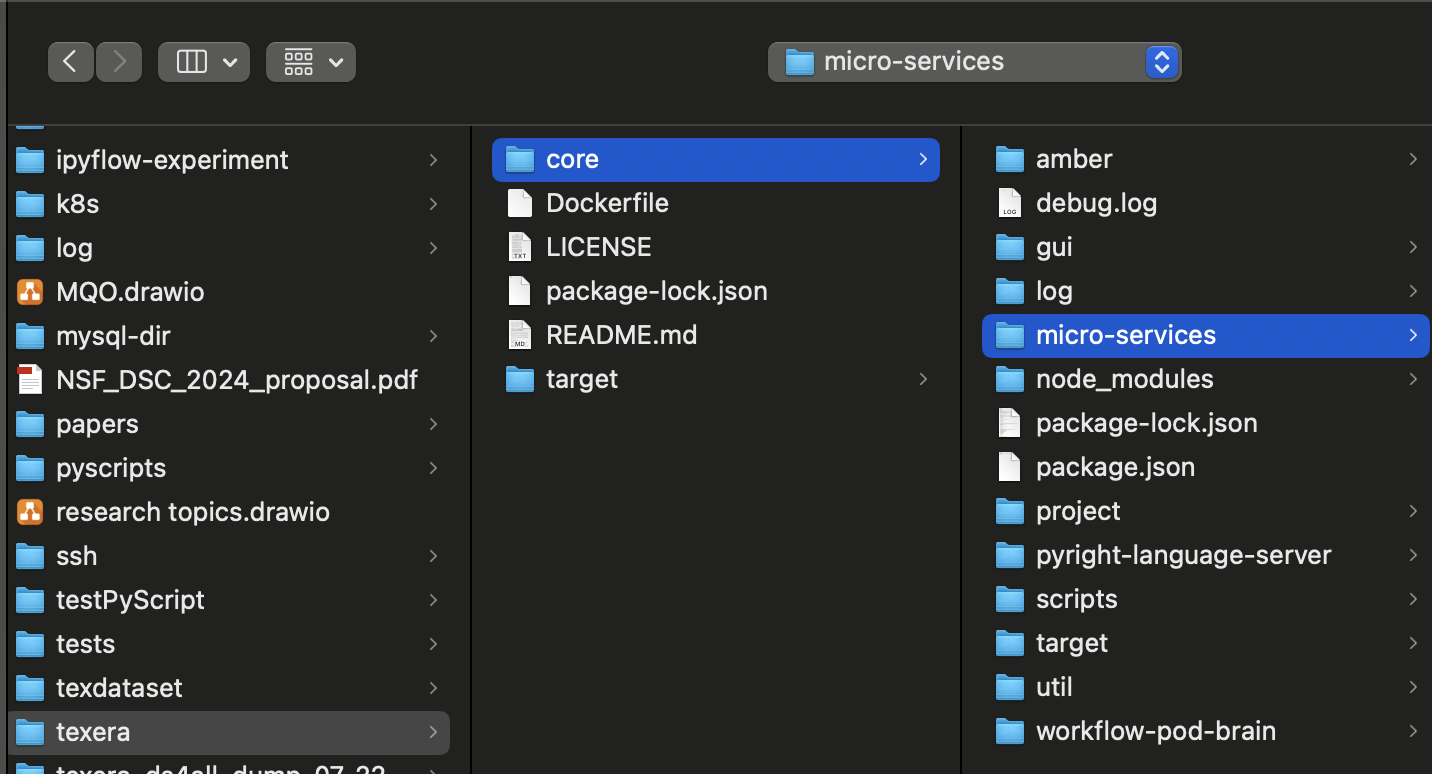
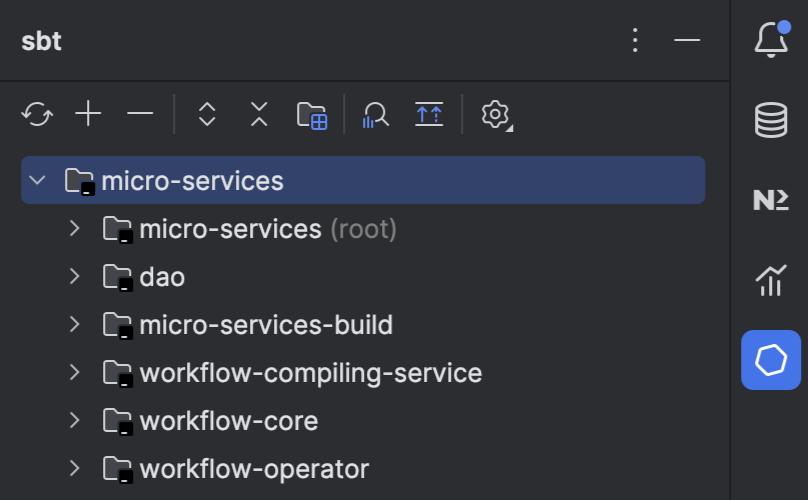
Once you open it, Intellij will auto-detect the sbt setting and start to load the project. After loading you should see the sbt tab, which has the micro-services as the root project and several other services as the sub-projects:
- Run
sbt clean compile command in folder core/micro-services. This command will compile everything under micro-services and generate proto-specified codes.
8 - [VOTE] Release Apache Texera (incubating) Email Template
Subject: [VOTE] Release Apache Texera (incubating) ${VERSION} RC${RC_NUM}
Hi Texera Community,
This is a call for vote to release Apache Texera (incubating) ${VERSION}.
== Release Candidate Artifacts ==
The release candidate artifacts can be found at:
https://dist.apache.org/repos/dist/dev/incubator/texera/${RC_DIR}/
The artifacts include:
- apache-texera-${VERSION}-rc${RC_NUM}-src.tar.gz (source tarball)
- apache-texera-${VERSION}-rc${RC_NUM}-src.tar.gz.asc (GPG signature)
- apache-texera-${VERSION}-rc${RC_NUM}-src.tar.gz.sha512 (SHA512 checksum)
== Git Tag ==
The Git tag for this release candidate:
https://github.com/apache/incubator-texera/releases/tag/${TAG_NAME}
The commit hash for this tag:
${COMMIT_HASH}
== Release Notes ==
Release notes can be found at:
https://github.com/apache/incubator-texera/releases/tag/${TAG_NAME}
== Keys ==
The artifacts have been signed with Key [${GPG_KEY_ID}], corresponding to [${GPG_EMAIL}].
The KEYS file containing the public keys can be found at:
https://dist.apache.org/repos/dist/dev/incubator/texera/KEYS
== How to Verify ==
Download the release artifacts:
wget https://dist.apache.org/repos/dist/dev/incubator/texera/${RC_DIR}/apache-texera-${VERSION}-rc${RC_NUM}-src.tar.gz
wget https://dist.apache.org/repos/dist/dev/incubator/texera/${RC_DIR}/apache-texera-${VERSION}-rc${RC_NUM}-src.tar.gz.asc
wget https://dist.apache.org/repos/dist/dev/incubator/texera/${RC_DIR}/apache-texera-${VERSION}-rc${RC_NUM}-src.tar.gz.sha512
Import the KEYS file and verify the GPG signature:
wget https://dist.apache.org/repos/dist/dev/incubator/texera/KEYS
gpg –import KEYS
gpg –verify apache-texera-${VERSION}-rc${RC_NUM}-src.tar.gz.asc apache-texera-${VERSION}-rc${RC_NUM}-src.tar.gz
Verify the SHA512 checksum:
sha512sum -c apache-texera-${VERSION}-rc${RC_NUM}-src.tar.gz.sha512
Extract and build from source:
tar -xzf apache-texera-${VERSION}-rc${RC_NUM}-src.tar.gz
cd apache-texera-${VERSION}-rc${RC_NUM}-src
Follow build instructions in README
== How to Vote ==
The vote will be open for at least 72 hours.
Please vote accordingly:
[ ] +1 Approve the release
[ ] 0 No opinion
[ ] -1 Disapprove the release (please provide the reason)
== Checklist for Reference ==
When reviewing, please check:
[ ] Download links are valid
[ ] Checksums and PGP signatures are valid
[ ] LICENSE and NOTICE files are correct
[ ] All files have ASF license headers where appropriate
[ ] No unexpected binary files
[ ] Source tarball matches the Git tag
[ ] Can compile from source successfully
Thanks,
[Your Name]
Apache Texera (incubating) PPMC